Understanding OpenID Connect (OIDC): A Practical Guide to the Flow
Sagar Paul
Overview
Welcome to the world of OpenID Connect (OIDC)! Whether you’re just starting out or you’re an experienced developer, this guide will help you get a solid understanding of how OIDC works. We’ll break down the flow, explain key attributes, and provide practical examples with Java and Postman. Let’s dive in!
What is OpenID Connect?
OIDC is like the bouncer of the internet. It ensures you are who you say you are before letting you into the digital party. Built on top of the OAuth 2.0 protocol, it allows applications to verify a user’s identity based on authentication performed by an authorization server. Think of it as getting an official wristband that tells everyone you’re legit.
The OIDC Flow: Step-by-Step
A visual representation of the OpenID Connect (OIDC) authentication flow, illustrating the key steps from user login to gaining access
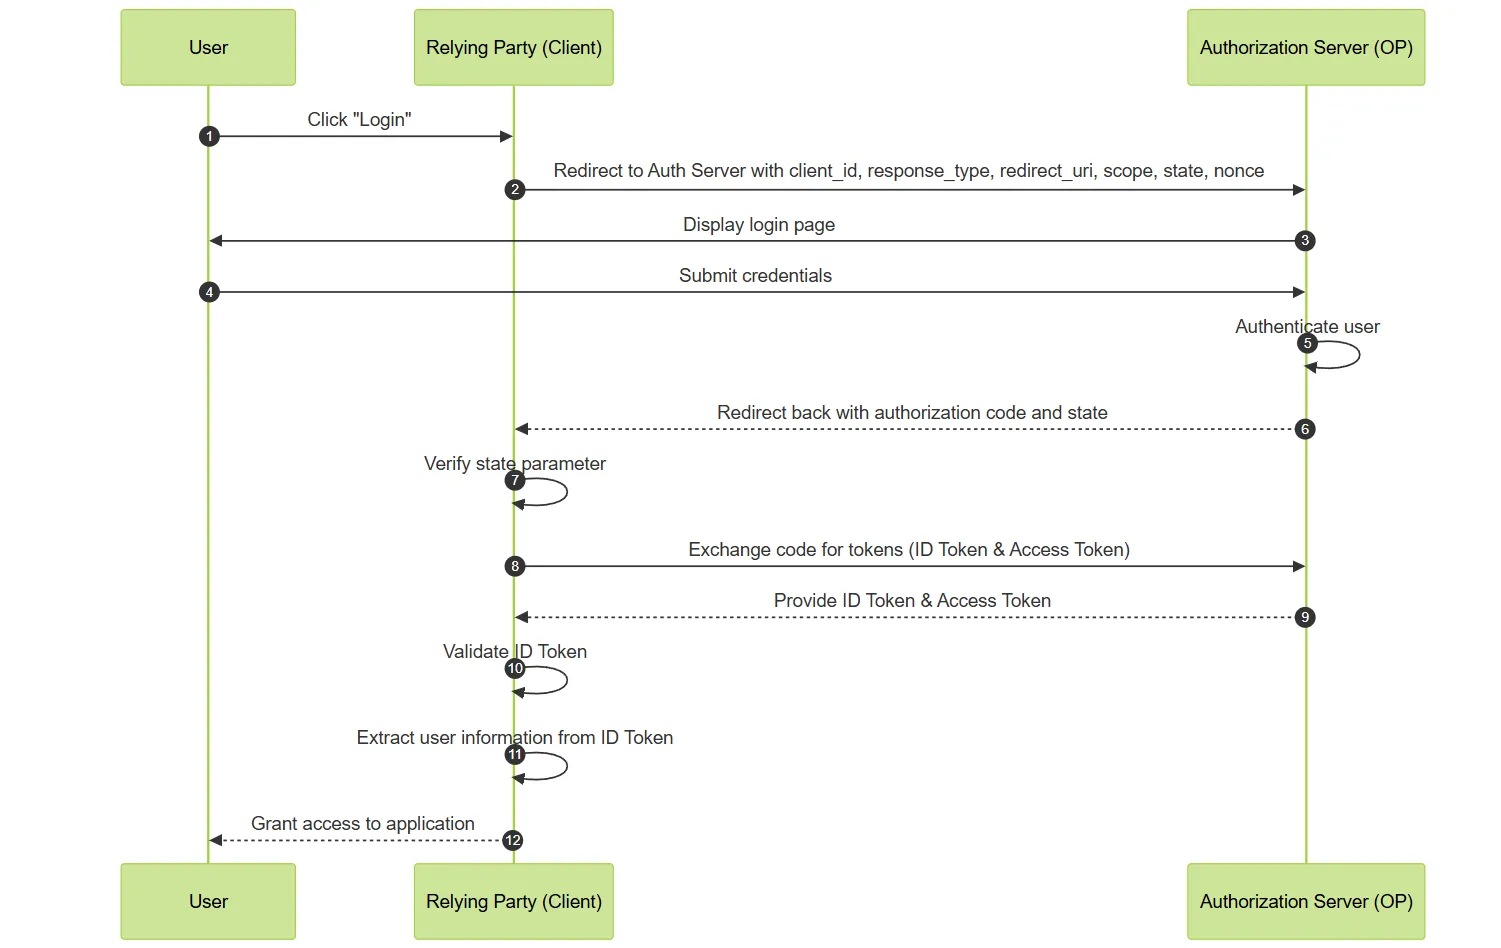
- User Initiates Login: Picture yourself trying to get into that exclusive club by saying, ‘Hey, let me in!’.
- Client Redirects to Authorization Server: The client sends you to the bouncer (Authorization Server) with your ID and reasons for entry.
- User Authenticates: You show the bouncer your ID (login credentials).
- Authorization Server Sends Authorization Code: The bouncer checks the list and gives you a special entry pass (Authorization Code).
- Client Requests Tokens: You take this pass back to the club manager (client), who exchanges it for an all-access wristband (ID Token and Access Token).
- Client Receives ID Token and Access Token: The manager gives you the wristband, which you proudly wear.
- Client Validates ID Token: The manager ensures that the wristband is legit and hasn’t been tampered with.
- User Gains Access: Finally, you’re in! Enjoy the party.
Key Attributes in the OIDC Payload
ID Token:
This is your party pass, and here’s what’s on it:
- sub: Subject - the unique identifier for you. Think of it as your party guest number.
- name: Your name, of course.
- email: Your email address, in case the DJ wants to send you the playlist.
- iat: Issued At - when you got the pass.
- exp: Expiration Time - when the pass becomes invalid. No all-night parties, folks.
Access Token: This token is like VIP access to various rooms inside the club, used to access special areas.
Refresh Token: This is your chance to get a new wristband without showing your ID again. Handy if you’re a frequent partier.
Security Features of OIDC
OIDC isn’t just about getting into the club; it ensures you’re safe while you party:
- Nonce: Prevents replay attacks by making sure your pass can’t be reused. It’s like having a unique stamp on your wristband.
- State: Protects against Cross-Site Request Forgery (CSRF) by ensuring the party invitation matches the state you’re in. Think of it as a bouncer asking a secret question.
- Signed Tokens: Ensures the integrity of tokens using digital signatures. Imagine your wristband has a holographic seal.
- HTTPS: Secure communication channels to prevent interception. Like having VIP security guards watching over the entry process.
Practical Guide: Implementing OIDC with Java
To get started with implementing OpenID Connect (OIDC) in Java, you can follow this GitHub link for a comprehensive example. Here’s a quick overview of the prerequisites and steps to configure Keycloak:
Prerequisites
- Start an OAuth2 Server: You’ll need an OAuth2 server like Keycloak to handle authentication. Keycloak is a robust and widely-used identity and access management solution.
- Set Up Keycloak: Follow the Keycloak Docker Setup Guide to set up and configure Keycloak.
Steps to Configure Keycloak
- Install Keycloak: Download and install Keycloak from the official website. You can choose to run it on bare metal, Docker, Kubernetes, or other environments.
- Create a Realm: Log in to the Keycloak admin console and create a new realm. A realm is a container for your users, applications, and other configuration.
- Create a Client: In your newly created realm, create a new client. This client will be your application that will use OIDC for authentication.
- Set Redirect URIs: Configure the redirect URIs for your client to match the endpoints in your Java application.
- Add Users: Add users to your realm and assign them appropriate roles and credentials.
Conclusion
By understanding the OpenID Connect flow in detail, you can enhance the security and user experience of your applications. Whether implementing it in a Java application or testing it through Postman, OIDC proves to be a powerful tool for modern identity management. Stay tuned for more in-depth guides and happy coding!
🚀 Elevate Your IAM with AuthSpoke
At AuthSpoke, we understand the complexities of modern identity and access management. Our modular, intelligent, API-first IAM platform is designed to simplify authentication and secure your enterprise, allowing your developers to focus on building innovative products.
Discover how AuthSpoke can streamline your identity infrastructure:
Sagar Paul
Founder, AuthSpoke
Identity nerd. DevSecOps advocate. Builder of secure-by-default systems.